With enthusiasm, let’s navigate through the intriguing topic related to Alright, young artist! Let’s dive into the wonderful world of drawing sea animals! . Let’s weave interesting information and offer fresh perspectives to the readers.
Introduction
Alright, young artist! Let’s dive into the wonderful world of drawing sea animals!

Why draw sea animals?
Drawing sea animals is a fantastic way to explore the amazing creatures that live beneath the waves. It’s not just about making pretty pictures, though! Drawing helps you:
- Learn about the world: You’ll discover the different shapes, sizes, and features of sea animals. You’ll learn about their habitats, what they eat, and how they move.
- Practice your observation skills: Drawing requires you to look closely at details. You’ll notice things you might have missed before, like the stripes on a dolphin’s body or the tiny tentacles on a jellyfish.
- Boost your creativity: Drawing allows you to imagine your own sea creatures! You can combine features of different animals, add fantastical elements, or even invent entirely new creatures.
- Develop your fine motor skills: Holding a pencil and making precise movements helps strengthen your hand muscles and improve your coordination.
- Have fun! Drawing is a great way to express yourself and let your imagination run wild.

Let’s get started!

Here’s a simple step-by-step guide to drawing some common sea animals:
1. The Starfish:
- Start with a simple shape: Draw a five-pointed star. Make sure the points are not too sharp.
- Add detail: Draw lines from each point towards the center to create arms. You can add bumps or dots on the arms to give the starfish texture.
- Color it in: Starfish come in many colors! Use your favorite shades of red, orange, yellow, purple, or even green.

2. The Fish:
- Draw an oval shape: This will be the body of your fish. Make it slightly longer than it is wide.
- Add a tail: Draw a curved line from the back of the oval. This will be the tail fin.
- Draw fins: Add two smaller oval shapes on the sides of the body for the pectoral fins. You can also add a dorsal fin on the top of the fish.
- Give it eyes: Draw two small circles near the front of the oval for the eyes.
- Color it in: Choose vibrant colors like blue, green, orange, or yellow for your fish. You can even add patterns like stripes or spots.


3. The Dolphin:
- Start with a curved line: This will be the back of the dolphin. Make it slightly curved and pointed at the end.
- Add a belly line: Draw a curved line below the back line to form the dolphin’s belly.
- Connect the lines: Connect the back and belly lines at the front and back to create the dolphin’s body.
- Draw a fin: Add a triangular fin on the back of the dolphin.
- Draw a tail: Draw a curved shape at the end of the dolphin’s body for the tail.
- Add a snout: Draw a small, pointed shape at the front of the dolphin’s body for the snout.
- Draw eyes: Add two small circles near the snout for the eyes.
- Color it in: Use shades of gray, blue, or even pink for your dolphin.
4. The Octopus:
- Draw a circle: This will be the head of the octopus.
- Add eyes: Draw two small circles near the top of the circle for the eyes.
- Draw tentacles: Draw eight long, curved lines extending from the bottom of the circle. These are the octopus’s tentacles.
- Add suction cups: Draw small circles along the tentacles to represent suction cups.
- Color it in: Octopuses can be red, brown, orange, yellow, or even white. You can add spots or stripes for extra detail.
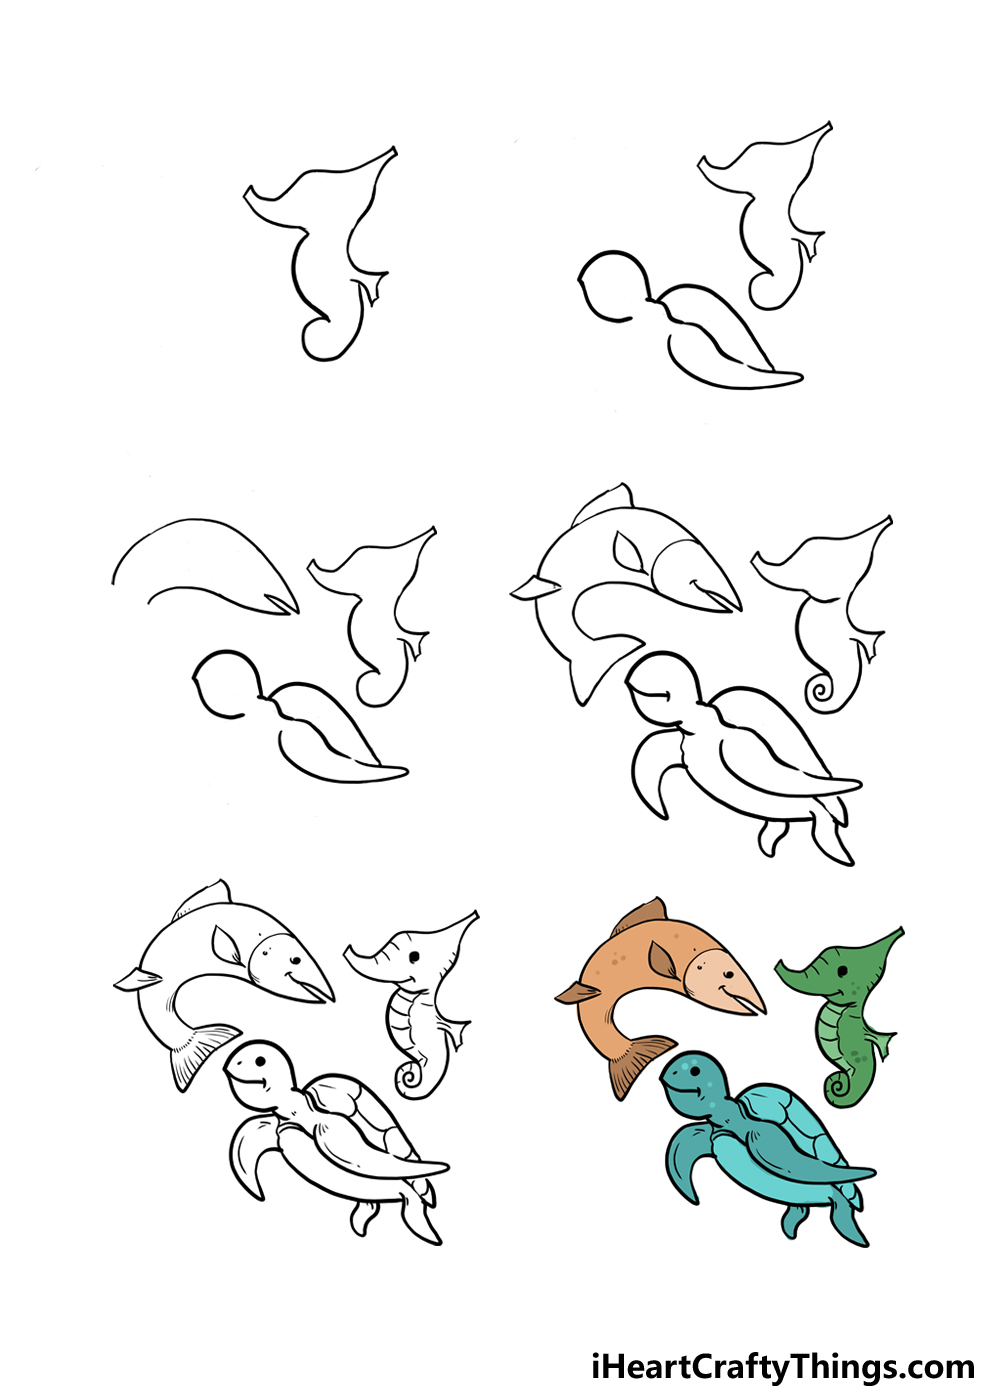
5. The Sea Turtle:
- Draw a rounded oval: This will be the body of the turtle.
- Add a head: Draw a small, rounded shape at the front of the oval for the head.
- Draw legs: Add four short, stubby legs to the sides of the body.
- Draw a shell: Draw a large, rounded shape on top of the turtle’s body. You can add lines and shapes to create the pattern of the shell.
- Add eyes: Draw two small circles on the head for the eyes.
- Color it in: Use shades of green, brown, or black for the turtle’s body and shell.
FAQs:
-
Q: What kind of pencils should I use?
- A: You can use regular pencils, but colored pencils are great for adding vibrant colors to your drawings.
-
Q: What if my drawings don’t look perfect?
- A: That’s okay! Drawing is all about practice. Don’t be afraid to make mistakes. Just keep trying, and you’ll get better over time.
-
Q: What else can I draw besides sea animals?
- A: You can draw anything you like! Draw your family, your pets, your favorite toys, or even make up your own imaginary creatures.
-
Q: Can I use other materials besides pencils?
- A: Absolutely! You can use crayons, markers, paint, or even chalk. Experiment with different materials to find what you like best.
-
Q: What’s the best way to learn how to draw?
- A: The best way to learn is to practice! Draw every day, even if it’s just for a few minutes. Look at pictures of sea animals, and try to copy them. Don’t be afraid to experiment and try new things.
Remember, drawing is a journey, not a race. Enjoy the process, have fun, and let your imagination soar!
Now, grab your pencils, crayons, or any other art tools you have, and let’s get drawing!
Thus, we hope this article has provided valuable insights into Downloads Alright, young artist! Let’s dive into the wonderful world of drawing sea animals! . We hope you find this article informative and beneficial. See you in our next article!